
3.9
Owner's of the iHome Clock Radio iH5 gave it a score of 3.9 out of 5. Here's how the scores stacked up:


11
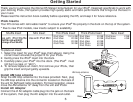
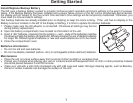
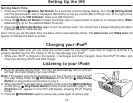
Setting Up the iH5
Your iH5 Home System comes from the factory preset to Eastern Standard Time. Just follow these simple steps
to match the setting to where you live.
1. Depending on your location and whether or not DST (Daylight Savings Time) is in effect, set the ƽ
DST
Switch located on the back of the unit to +1 or -1 to activate the DST adjustment feature. Activating the +1
switch will advance the time one hour.
2. Press and hold the ƻ Time Zone Button located on the back of the unit for approx. 2 seconds until the
Time Zone Indicator at the lower right hand side of the display shows current time zone. Turn the ¸ Setting
Knob to select the time zone.
ATL - Atlantic
EAS - Eastern
CEN - Central
MTN - Mountain
PAC - Pacific
ALS - Alaska
HAI - Hawaii
3. Press the ƻ Time Zone Button again to exit the setting mode. You should hear 2 beeps indicating the
time zone has been set.
4. If for any reason the time showing is not correct, please see Setting Clock Time and Calendar to set the
clock.
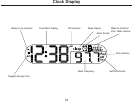
Setting Clock Time and Calendar
1. Press and hold the Ƽ Clock Adj Button located on the back of the unit for 2 seconds until the display
flashes. Turn the ¸ Setting Knob until the current time is displayed. Remember to set the correct AM or
PM (an icon to the right of the time display is the PM indicator; there is no AM indicator).
2. Press the Ƽ Clock Adj Button again to confirm clock setting. You should hear 1 beep indicating the clock
time is set.
3. The year display at the lower right will flash. Press the Ƽ Clock Adj Button to accept the current setting,
or turn the ¸ Setting Knob until current year is displayed. Press the Ƽ Clock Adj Button to confirm year
setting. You should hear 1 beep indicating the year is set.
4. The date display at the lower right will flash. Press the Ƽ Clock Adj Button to accept the current setting,
or turn the the ¸ Setting Knob until current date is displayed. Press the Ƽ Clock Adj Button to confirm
date setting. You should hear 2 beeps indicating the date is set and will exit Clock and Calendar setting mode.


Find Your Products By Category
Please Login
